
Life has changed.
I never thought I would look forward to working out, especially cycling (I used to make fun of those “crazies” with an addiction to Peloton or SoulCycle)… but with coronavirus keeping us in our homes we’ve all had to make adjustments. The turning point for our household was when my husband and I both expressed to one another how unhappy we were with the fact that none of our respective clothes fit our bodies anymore and with how very sluggish we felt.
Time to switch it up!
After some conversation and a bit of research, a stationary bike felt like the most logical move for us because: (1) the machine takes up very little space compared to other equipment options and we have a pretty small house so that was a priority, (2) working out at home eliminates germ exposure (hello, COVID-19), (3) no schedule planning or time wasted from the commute to / from the gym, (4) in crappy outdoor weather (which is literally nine months out of the year here in Seattle) there is absolutely no excuse not to work out, and (5) it’s just insanely convenient to clip in whenever you want and just start riding.
Why Peloton? Honestly, it came down to reputation. We’ve only ever heard positive reviews from our friends / family / colleagues that own a Peloton. Come to think of it, I don’t think I’ve ever heard anything negative about the bike from anyone that’s ever owned one. I also want to add that the community seems very positive and centered around being healthy (both physically and mentally!) as opposed to pressuring toward weight loss or falling into that [often toxic] “gym culture” mindset, at least in my experience.
Plus, there are SO MANY class options depending on what your wants / needs are, such as varying class lengths, music preference, intensity level, instructor preference, areas of your body that you want to focus on for that ride, etc. I love that you can adjust your workouts to your schedule and lifestyle!
ORDERING:

Peloton is now offering an amazing financing option, which is newly introduced during the pandemic, making their products available to more people which I think is fantastic! Currently the pricing is from $2,245 or $58/mo for 39 months at 0% APR (!!!)
*Note that the cost of the All-Access Membership is separate.*
**UPDATE 2020.09.08: Peloton is lowering the price of their original stationary bike by $350 which brings the cost down to $1,895 starting tomorrow, September 9th!!!
Any gear is available bundled (at a small discount) or offered a la carte. We went with the Family Bundle since we both needed our own shoes, but we didn’t necessarily need all of the additional pieces. I’ll speak more to this in the “GEAR” section.
—> Fair Warning: we ordered our Peloton on July 11th and the earliest delivery date was August 25th, so just brace yourself for a similar kind of time frame if ordering soon. Hopefully things will normalize soon, but who knows.
Due to the coronavirus there’s an increased demand from everyone looking for ways to work out at home and on the flip side of that, factories are producing products at a slower pace due to safely distancing employees. The combination is going to cause delays; just be patient — it’s worth the wait. (Read: if you are planning to gift one for a holiday / birthday, I would make sure to plan ahead and budget at least a month’s lead time when ordering).
While you wait for your bike to arrive, you should definitely download the Peloton app and create an account with your Peloton provided access code! You can check out all of the class offerings and familiarize yourself with the mobile interface (which is very similar to the interface on the bike’s monitor, just in a different layout). I recommend taking some of the non-bike related classes — I followed along on a few of those workouts (15 min HIIT Cardio w/ Jess Sims!) in anticipation of our Peloton arrival and really fell in love with the class dynamic (so encouraging and motivating!), which totally carries over to the cycling workouts.
DELIVERY & SETUP:

For a smooth setup process, I recommend having: (1) already determined the space that you want to have your bike set up in (making sure there is a power outlet nearby!), (2) created a wide, clear path for the delivery techs to easily carry the VERY heavy bike to your preferred setup location, (3) your WiFi password handy, and (4) your Peloton account login details all ready to go!
The delivery technicians had the bike pre-assembled, handed us all of the boxes of our accessories, helped us to quickly set up our new bike’s hardware / software, and answered all of our questions (they were so knowledgeable!). Honestly, the whole delivery took maybe 20 minutes from start to finish; I’d even argue that it was probably closer to 15 minutes.

Coronavirus Delivery Precautions:
The above screenshots are directly from emails that I received from Peloton to make sure we knew what to expect from the delivery / setup process and what was expected on our part (wear masks, etc.).
We all wore our masks during the entire delivery process, my husband and I opened all doors and moved any necessary furniture so that the delivery technicians only had to touch the bike (which we sanitized as soon as they left, even though they were wearing gloves from start to finish). The delivery techs were extremely professional and were very cautious about not damaging the bike or our house even though they had to carry the bike on some very narrow / steep stairs (sorry, guys!).
GETTING STARTED:

Riding
The user interface on the monitor is pretty intuitive. We figured out how to sync up our wireless headphones via Bluetooth and I began bookmarking rides I was interested in taking. I love the Class Search filters — being able to choose my preferred music style, how long I want the workout to be, or the ride ability level (Beginner, Advanced Beginner, etc.) makes it so easy to find the classes that I want to follow along with.
Following the bike’s “Peloton 101” instructions on how to calibrate your bike for your body type is SUPER important. Don’t just start riding the way that it arrives because you could really hurt yourself! There is a tutorial available within your Peloton screen’s menu that you can reference any time, but I’ll share an additional rundown on Youtube here so you can get an idea of how to make the necessary adjustments.

Pedaling the bike is super smooth (+ quiet!) and I love the fits and finishes of the whole machine. It’s a relatively simple design — I mean, it’s a stationary bike so it won’t be that fancy. It doesn’t take up very much space (the footprint is only 2 ft x 4 ft!!) so it was pretty easy to find room for it in our small house, the seat is as comfortable as a bicycle seat can be, and the cushy grip / shape of the handlebars give me confidence and stability no matter where I decide to place my hands during rides. The big red button / knob serves a major purpose with the bike: pressing it down applies your brakes and turning it like a dial adjusts the resistance during your rides.
If you are in an apartment / condo / townhouse, don’t dismiss this option because you think that it would disturb your neighbors — as long as you use headphones for the audio, it’s a completely silent experience. 🙌🏼

I have personally found that there is a mega learning curve regarding the cycling shoes in general, as well as the process of un-clipping my shoes from the bike. I felt like such a dummy, but I could NOT figure out how to release the tightened strap over the top of the shoe (… turns out you just press the button in the center of the strap clip — see above 🤣). I also discovered the shoe / cleat directions in the bottom of the box under the tissue paper wrap, so I recommend searching the shoebox a little better than I did. lol
I’m still working on getting comfortable with the foot movement to un-clip from the bike, but it’s feeling more and more “natural” after each ride. I have also heard that you will need to adjust / tighten your shoe cleats after every few rides so I recommend keeping the little cleat tightening tool handy.
…
Classes
I can not stress this enough:
TAKE. THE. BEGINNER. CLASSES.
If you’re already an active individual or have been cycling before, you should still take at least one beginner class which will give you a good foundation for your Peloton journey by getting familiar with the bike / screen layout and functions. If you are out of shape (like me) or just a cycling beginner — don’t try to run before you can walk. I took a beginner class one day and the next day I foolishly thought I could jump right into a regular class. I nearly gave up / passed out a few times during that 30 minute ride (I forced myself to finish the class, but I won’t be making that mistake again any time soon!). After that, I decided to gradually work my way up from Beginner > Advanced Beginner > Regular Rides. There is plenty of opportunity to make a Beginner ride more intense if you find that the ride is too easy for you — just crank up that resistance knob!
All I’m saying here is to follow your body’s cues — push yourself, but also be sure to pace yourself.
GEAR:

Shoes
I am brand new to the cycling world so I had absolutely no idea how attaching cleats worked. To actually install the cleat that clips your shoes into the bike pedals I had to watch this tutorial (official tutorial here) to figure out how to do it the right way. It seems relatively intuitive, but I wanted to be sure I was aligning the pieces properly. The cleats are adjustable according to whatever your preferred placement is, but to start out I tried to get them as centered as possible as a starting point.

Bike Mat
It’s essentially a cushy yoga mat that the bike sits on to absorb any movement and stay stationary on a hard and otherwise slippery surface. It’s perfectly fine and easy to clean; nothing particularly remarkable to report on this item.

Hand Weights
There is a perfect little hook on the back of the bike to hold these weights and I can’t wait to build my strength and endurance up to the rides that include the weights so that I can tone my arms too. We chose the 2 lb. weights, but Peloton offers 1 lb. and 3 lb. weight options as well.

Glass Water Bottle
Always a fan of a glass water bottle, especially with a silicone wrap to make it easier to grip when you are dripping sweat from every pore on your body. I pretty much carry it all around the house with me now to stay hydrated. It holds 24 oz. of water, so it’s easy to get your day’s worth of water intake!
*UPDATE* My husband dropped his bottle when full of water on our concrete basement floor and despite the silicone wrap it completely shattered, so just be aware that the glass isn’t intended to withstand that kind of pressure.

Headphones
Ever since we made the switch from wired headphones to wireless, I just can’t go back. I guess the Peloton provided ones will come in handy if I forget to charge my AirPods or if the wireless ear buds decide to just quit on me one day, but I can’t imagine ever choosing for my head to be tethered to the bike over using my wireless AirPods. It’s nice to have the option as a “backup”, but I doubt I’ll ever use them. (This is not to say that they aren’t good quality ear buds, but I am so “anti-tether” now! lol).
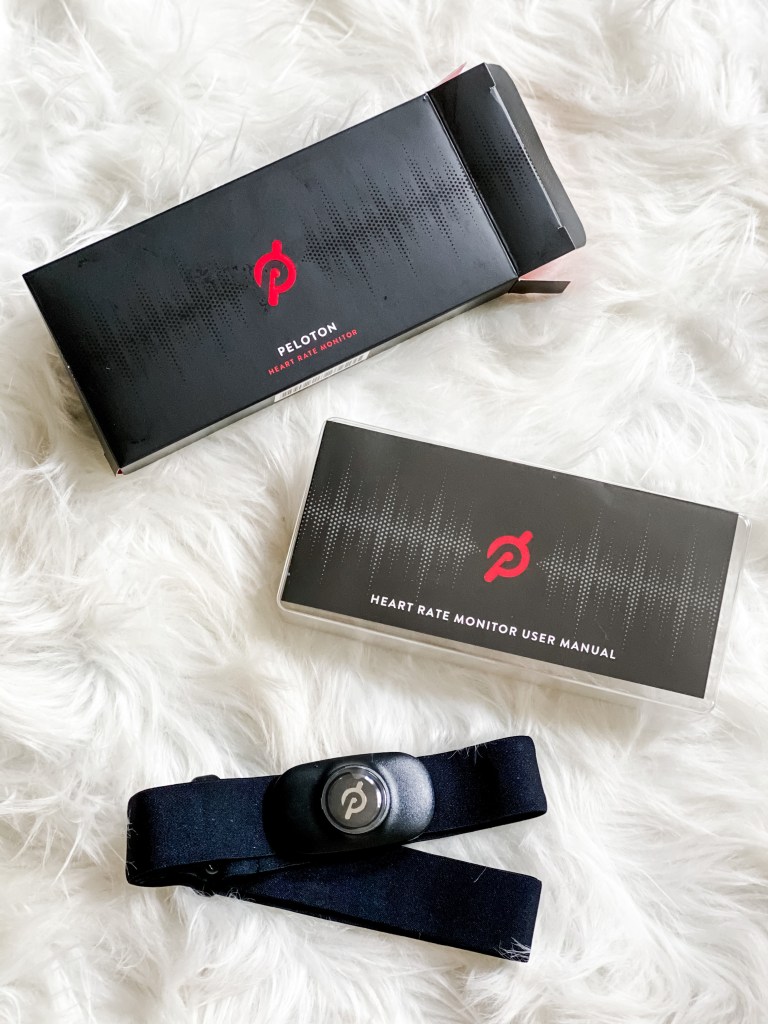
Heart Rate Monitor
I should probably be using this device to monitor my heart rate levels during my workouts, but I have my Fitbit for that. We received these as part of our bundle, but I don’t anticipate using mine as the monitor is a chest strap and my Fitbit is worn easily on my wrist. Again, another “nice to have” option that I don’t plan to use often, but it’s good to know that I have it just in case.
I’m working on putting together a “Peloton Favorites” post with all of my favorite rides, instructors, and gear so keep an eye out for that followup post in a few months.
*Update: link here!
Please let me know if you have any other Peloton-related questions in the Comments section. I’m a complete newbie to cycling, but I’m more than happy to share my opinion / experience with you!
Ride with me! My Peloton username is:
natalie_maria
let’s be bike buddies! ☺️
Sending hugs —
xx, Natalie
[…] have to spread our portions out over the course of the week or so! (Plus, that’s what the Peloton is for! 🤪) To make life easier on yourself, this dessert can also be made […]